


What if the most important part of your new smile isn’t actually the teeth you see in the mirror, but the hidden space right beneath them? It’s completely natural to feel a bit of anxiety about food getting trapped under your bridge or wondering how to clean All-on-4 implants effectively to avoid bad breath. You’ve made a life-changing investment in your health. It’s normal to want the absolute best for your long-term care. We understand that the fear of implant failure can feel overwhelming, but keeping your smile vibrant doesn’t have to be a source of stress.
This guide reveals the exact steps you need for a simple, repeatable routine that protects your investment and your health. We’ll show you how to manage the vital bridge-to-gum interface to prevent gum disease and keep your breath fresh. From selecting the right tools for your home care to understanding the professional maintenance required to keep your smile healthy here in Vancouver, WA, we’ve got you covered. You’ll finish this article with the confidence that your implants are spotless and your smile is secure for life.
Key Takeaways
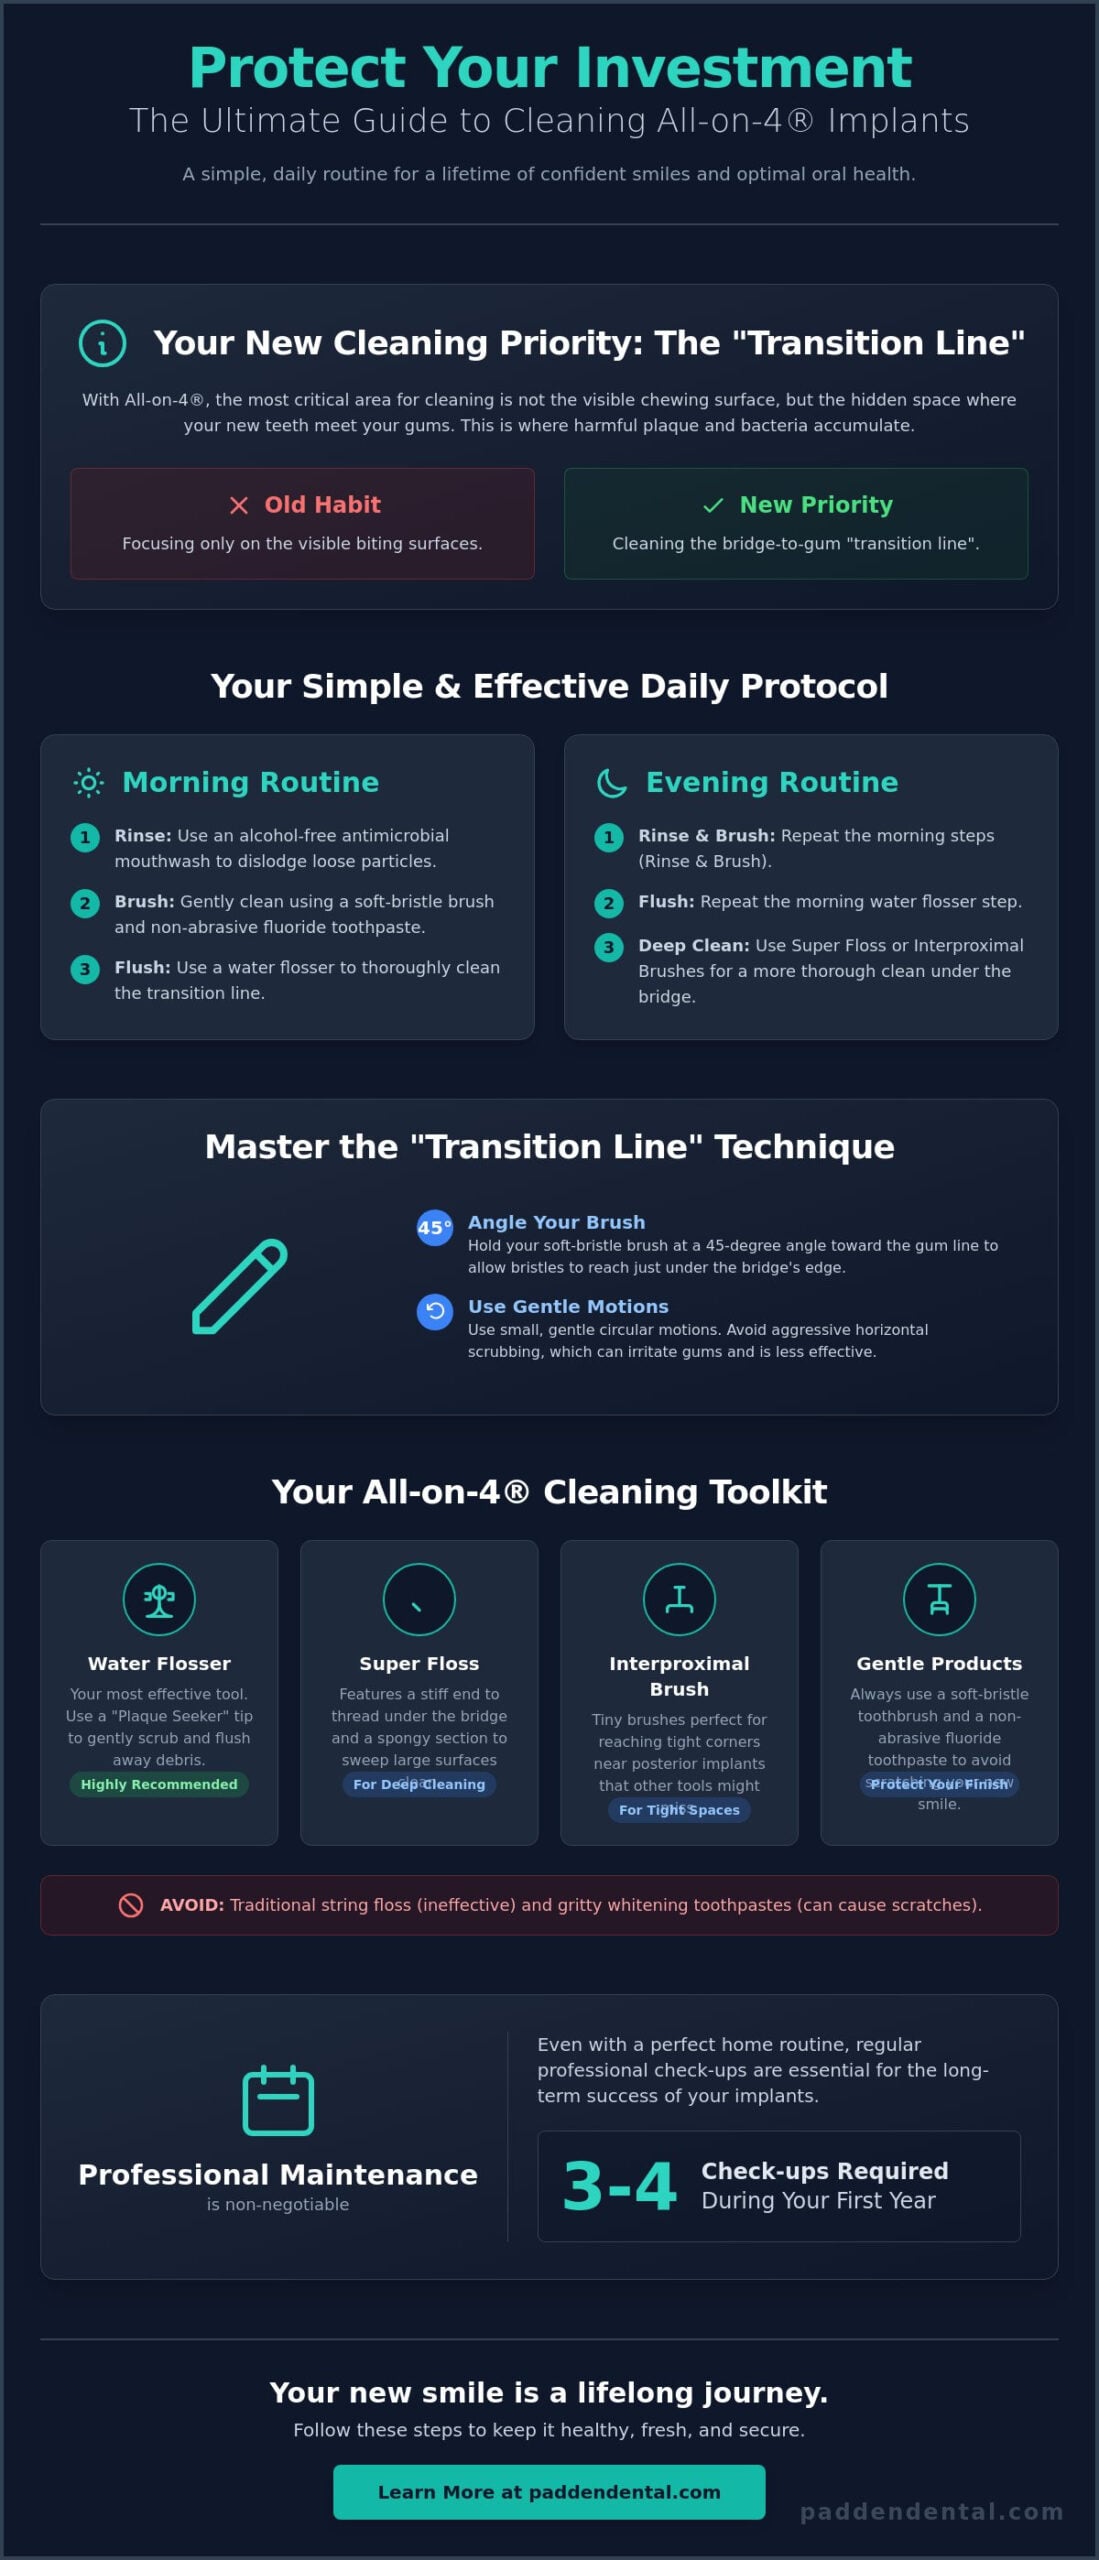
- Learn why your daily cleaning focus must shift from the visible biting surface to the critical interface where your bridge meets the gums.
- Discover how to clean All-on-4 implants using specialized tools like water flossers with plaque-seeker tips, which are much more effective than traditional string floss.
- Master a simple morning and evening protocol that removes trapped food and gives you total confidence in the freshness of your breath.
- Find out why professional maintenance visits are essential for your success, typically requiring three to four check-ups during your first year with your new smile.
Mastering Your Daily All-on-4 Cleaning Routine
Transitioning to a full-arch restoration is an exciting step toward better health and a more confident lifestyle. While your new teeth look and feel remarkably natural, they require a specific approach to daily care that differs from natural teeth. Most people spend their lives focusing on the biting surfaces of their teeth. With this system, your primary goal shifts to maintaining the health of the gum tissue and the connection points. Understanding what dental implants are helps you see why this matters; the titanium posts rely on healthy bone and gums to stay secure for a lifetime.
The transition line is the primary area where plaque accumulates on All-on-4 systems. This is the delicate space where your prosthetic bridge meets your natural gum tissue. To keep this area healthy, you should follow a consistent morning and evening protocol. Always choose a non-abrasive fluoride toothpaste for your routine. Many standard whitening toothpastes contain gritty particles that can dull or scratch the beautiful finish of your prosthesis over time. Using a gentle formula ensures your smile stays as bright as the day it was placed.
The “Transition Line” Technique
Precision is always better than pressure. When you are learning how to clean All-on-4 implants, the angle of your brush makes all the difference. Hold your soft-bristle brush at a 45-degree angle toward the gum line. This specific angle allows the bristles to gently reach slightly under the edge of the bridge to clear away hidden debris. Use small, gentle circular motions to sweep away plaque. It’s best to avoid aggressive horizontal scrubbing. This can irritate your gums and won’t effectively reach the spots where bacteria tend to hide.
Rinsing and Antimicrobial Support
A successful routine often begins with a thorough rinse. Using an alcohol-free antimicrobial mouthwash helps dislodge loose food particles before you even start your mechanical cleaning. We recommend alcohol-free formulas because they don’t dry out your delicate oral tissues, which is vital for your long-term comfort. This simple step makes the rest of your routine much more effective and leaves your breath feeling crisp and clean throughout the day.
Essential Tools for Maintaining Your New Smile
Selecting the right equipment is just as important as the technique itself. While traditional string floss is a staple for natural teeth, it’s often ineffective for fixed bridges. Because your restoration is a single, continuous piece, you can’t “floss between” the teeth in the traditional sense. Instead, you need tools designed to navigate the space between the bridge and your gums. Using the correct instruments is a cornerstone for the long-term success of All-on-4, ensuring that the underlying tissue remains firm and infection-free.
Interproximal brushes are another fantastic addition to your kit. These tiny, specialized brushes are perfect for reaching the hard-to-reach corners near your posterior implants. They slide easily into the small gaps that a standard toothbrush might miss. Remember to inspect your tools regularly for signs of wear. If the bristles on your brushes or the tips of your flosser look frayed or bent, they won’t clean as effectively. Replacing these every three months keeps your routine efficient and your smile bright. If you’re unsure which size brush fits your bridge best, our team at Padden Dental can help you select the perfect match during your next visit.
Why a Water Flosser is Your Best Friend
A water flosser is often the most recommended tool for anyone learning how to clean All-on-4 implants. Unlike standard tips, specialized “implant” or “plaque seeker” tips feature small tufts of bristles that gently scrub the implant surface while the water stream flushes away debris. It’s best to start with a low pressure setting to avoid irritating healing gum tissue. You can gradually increase the pressure as you become more comfortable, focusing the stream on “flushing” the space between the bridge and the roof of your mouth or lower jaw.
Leading restorative practices like Alpha Dental Excellence emphasize that using these specialized tools correctly is just as important as the initial surgery for achieving a lasting, healthy result.
Using Super Floss and Threaders
For a deeper clean, super floss is an excellent choice. Specialized floss features a stiffened end to navigate the bridge without a separate needle threader. This allows you to safely thread the floss under the titanium framework and pull the spongy middle section through. This soft, yarn-like portion of the floss is specifically designed to sweep away plaque from the large surface area under the bridge, providing a level of cleanliness that water alone sometimes misses.
Professional Maintenance and Long-Term Health in Vancouver
During these check-ups, Dr. Padden and our dedicated team carefully monitor the bone levels around your titanium posts. This proactive approach helps us catch tiny changes in your jaw health that aren’t visible to the naked eye. We understand that deep cleanings or clinical exams can feel stressful for some. To make your experience as relaxing as possible, we offer sedation dentistry in Vancouver, WA. It’s our way of ensuring you feel completely comfortable and cared for while we protect your beautiful investment.
What Happens During a Professional Visit?
Our clinical cleanings are much more thorough than a standard dental check-up. Occasionally, we may choose to remove your prosthesis to perform a deep cleaning of both the bridge and the underlying implants. We use specialized ultrasonic tips crafted from materials that won’t scratch the sensitive titanium surface. This meticulous process removes hardened deposits that water flossers can’t reach, keeping the interface smooth and healthy for the years ahead.
Recognizing the Signs of Peri-Implantitis
Your body is excellent at sending signals when something needs attention. Keep an eye out for warning signs like bleeding gums, a persistent bad taste, or any feeling of “looseness” in your bridge. These can be early indicators of peri-implantitis, a condition similar to gum disease that specifically affects implants. Early intervention at our dental implant clinic can often save a failing implant and restore your oral health quickly. Your long-term success is our primary goal, and we’re here to support you every step of the way.
Ensuring Your Long-Term Success
Mastering the daily habits needed to maintain your restoration is the most significant step you can take toward a lifetime of health. By focusing on the transition line and using specialized tools like water flossers and super floss, you’re actively protecting your vibrant new look. Learning how to clean All-on-4 implants effectively doesn’t just prevent bad breath; it builds the foundation for a stable and comfortable future. While your home routine is vital, partnering with an experienced team ensures that every detail of your health is monitored with precision.
Dr. Eric Padden and our team have provided expert care in Vancouver, WA since 2004, and we’re dedicated to helping you enjoy the results of your investment. We offer compassionate sedation options for all restorative procedures to ensure your maintenance visits are entirely stress-free. Your journey to a healthier life is one we’re proud to support. Schedule your professional All-on-4 maintenance visit at Padden Dental today. We look forward to seeing your smile continue to shine for many years to come.
Common Questions About All-on-4 Care
Can I use a regular toothbrush to clean my All-on-4 implants?
Yes, you can use a manual toothbrush, provided the bristles are soft. Medium or hard bristles can create microscopic scratches on the acrylic or porcelain surface of your bridge. These scratches then become magnets for bacteria and stains. Focus your brushing on the area where the bridge meets your gums. This gentle approach keeps the material smooth and your gum tissue healthy without causing unnecessary wear.
Is it normal for my gums to bleed when cleaning under the bridge?
Light bleeding is common during the first few weeks after your procedure as your tissues heal and adjust. However, if you’ve had your implants for a while and notice persistent bleeding, it’s often a sign of inflammation. This is your body’s way of asking for a more thorough cleaning in that specific area. If the bleeding continues for more than a few days, it’s a good idea to visit us for a quick check.
How often do All-on-4 implants need to be professionally cleaned?
Most patients need professional maintenance visits three to four times during the first year after their procedure. This allows us to monitor your healing and ensure your home routine is working perfectly. Once your implants are fully integrated and your oral health is stable, we typically move to a twice-yearly schedule. These regular visits are essential for the long-term success of your new smile and your overall health.
What happens if I don’t clean under my All-on-4 bridge?
Neglecting the space under your bridge leads to plaque accumulation, which can cause a condition called peri-implantitis. This inflammation affects the gums and bone supporting your implants. Without proper care, you may experience chronic bad breath, gum recession, or even the loss of the implant itself. Learning how to clean All-on-4 implants daily is the best way to prevent these complications and protect your investment for years to come.
Can I use an electric toothbrush on my dental implants?
You can absolutely use an electric toothbrush, and many patients find them much more effective than manual ones. The rapid vibrations help break up plaque along the gum line with minimal effort. Just ensure you’re using a soft-bristle head and aren’t applying too much pressure. It’s a great tool to incorporate when you’re mastering how to clean All-on-4 implants for a professional-level feel at home every single day.
Will food always get stuck under my All-on-4 implants?
While a well-designed bridge is contoured to fit snugly against your gums, small food particles can occasionally find their way underneath. This is a common part of living with a full-arch restoration. Most patients find that a quick rinse or a few seconds with a water flosser after meals clears these particles immediately. As you get used to the feel of your bridge, these moments become a minor, easily managed part of your daily routine.